
The first thing we need to do is find out what size to make.
There should be a size table somewhere in your book. More often than not it appears after the photos and before the pages of instructions. But it could appear after the instructions or even on the individual instructions page for your garment.
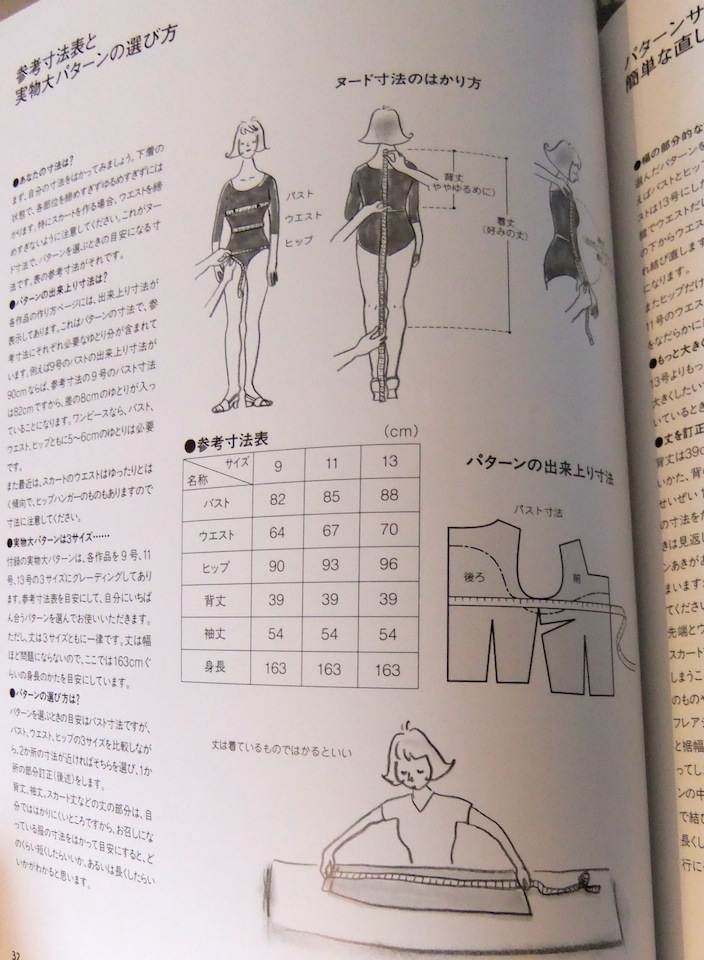
There is a good guide to measuring yourself here. Keep a note of your measurements to save you doing it again next time.
In Feminine Wardrobe, the page looks like this:

Along the top are the different sizes on the pattern sheet. These can be the usual S, M L but can also be numbers such as 7, 9, 11. I often make the mistake of presuming that compared to a petite Japanese figure I am a massive giant, but more often than not, I will be somewhere in the middle of the chart as I am in the UK. I do have a long back and many tops from Japanese books can stop around the waist, so I usually end up making them a little longer.
By consulting with my translation sheet, I can see that down the side, the table reads as follows:

I am closest to large, I was expecting to be a medium, but I’ll go with what the table says. I'm not sure what the last measurement is, I think it is height judging by the size.
Whilst I normally would avoid writing in a book, I have started writing notes, translations, sizes used to save myself going through the whole process next time I use the book. Translations in particular I note down (especially on the pattern sheet) because however much I may think I will remember a translation, as soon as I look away from the page it is forgotten.
Some books have a picture with the different measurements written on them (e.g. Simple Chic below) so that even saves you the bother of doing a translation.
This book has an extra page before the individual instruction pages, I’ve not seen this before. But looking at the pictures it appears to be grouping the garments together that are a variation on the same pattern.

My top (C2) is part of a happy family that includes a dress (C1) and another top (C3). There is a load of text here which I won’t begin to try and translate, but looking at the table, and the pictures, I think it is explaining the different lengths of the bodice of these 3 variations. 丈 means height. It also seems to be showing the different sleeves involved, 袖 means sleeve.

I don’t think this page includes any extra info I need, but I may well be wrong and come back to it later. There is a certain amount of trial and error when using a book in a language you don’t understand!
Here is my secret about this books, I probably translate 5 - 10% of the instruction page(s) because everything I need to know is shown in the pictures. Sometimes there is the odd detail where I will try and figure it out, but a lot of the time, I don't need it.
Going to the page in the book for my top, there are some more details there I need to think about. I’m a little shocked to see it is just one page, as usually there are at least 2 and it’s a fairly complicated top.

But further investigation shows that it shares some instructions with the first variation of this pattern (C1) on the previous page, panic over.
There may be a materials list on this page. Mine is blissfully brief;

You can normally piece together several different characters to translate a term. So here I have heavy-weight and interfacing. I take surface fabric to be garment fabric (as opposed to lining fabric).
The pattern layout diagram looks like this, familiarise yourself with all the different pattern pieces. This diagram includes useful info such as some seam allowances, although for most of the pieces it is not shown, so I am going to use 1cm, sometimes I use 1.5cm. Japanese pattern sheets do not include seam allowances.

I can see that the fabric is folded in half, it is 110cm wide and 170 -180cm long. I can also see which side is the fold, where to place the pattern pieces, but also some of the pieces are shaded. This could show the right or wrong side of the fabric but in this case it is because these pieces are cut from interfacing. This character 枚 shows you how many to cut, so 2 枚 means cut 2.
From the diagram and conferring with my translation sheet, I can see that I need to cut;
4 sleeves (each sleeve has 2 layers) 2 are cut on the bias
1 bodice front cut on the fold
1 bodice back cut on the fold
1 back neck facing, cut from interfacing
1 front neck facing, cut from interfacing
Next up, deciphering the pattern sheet and tracing off your pieces.
Posts in this series:
1. Sewing from Japanese Craft books - what you will need and an overview
2. Sizing and figuring out the instruction page
I know I haven't covered much ground in this post but thought if I covered tracing the patterns out too it would go on forever! I'll try and post the next one a bit sooner to make up.
ReplyDeleteIt's a really useful post - thanks Kate. I thought the instructions for my skirt were a bit short - after reading your post, I now realise there are directions to other pages for sewing the zip, lining and waistband! x
ReplyDelete